From writing letters to writing checks, technology has driven everything online. Gone are the days of manually processing invoices, “cutting” paper checks, and mailing them off to your vendors. That’s why Sage Intacct provides the ability to pay vendors electronically using ACH payments (or sending a digital check, if you will). And if you're using the Time & Expenses module, you can also use ACH to reimburse employees for expenses directly to their bank accounts. So let’s take a look at how to set up and use Intacct ACH payments.
What Does ACH Stand for In Accounting?
First things first. Let’s take a quick look at what ACH is. ACH stands for Automated Clearing House and is comprised of a network and set of standards that allows consumers and businesses alike to process financial transactions electronically. Whether you know it as direct deposit, electronic payment, or online bill pay, the ACH Network processed 24.7 billion payments in 2019.
Intacct ACH Payments Setup
Before you can setup ACH payment details in Sage Intacct, you’ll need to contact your bank(s) to request their ACH payment specifications (sometimes called an “ACH Specification Sheet”). Each bank may have different requirements and you’ll need to create a unique ACH Bank record for each financial institution that you'll be using to process electronic payments for in Sage Intacct.
In addition, you may need to contact your administrator and get the permissions required to set up Standard ACH. You'll need permissions to checking accounts and ACH bank configuration in Cash Management, as well as bank details for vendors and employees.
Configuring ACH Payments for Your Bank
In addition, you may need to contact your administrator and get the permissions required to set up Standard ACH. You'll need permissions to checking accounts and ACH bank configuration in Cash Management, as well as bank details for vendors and employees.
Configuring ACH Payments for Your Bank
- Go to Cash Management from the navigation bar
- Select the Setup tab
- Click +ACH Bank Configurations
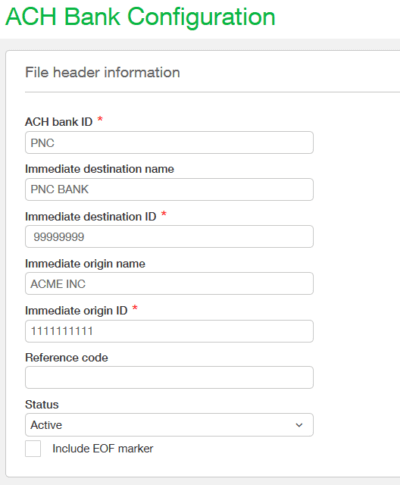
- Fill in the details on the ACH Bank Configurations screen
- In the ACH bank ID field, enter a unique name for the bank (up to 20 characters). This can be anything that will help you identify the bank, such as "Chase" or “PNC”
- Complete the remaining fields in the ACH Bank Configurations screen using the specifications provided by your bank
- Save when complete
Here’s a glossary of what the terms in each field indicate:
Setting Up Checking Accounts
Now that ACH payments are configured for your bank, you'll also need to specify ACH information for each checking account that you'll be issuing payments from by following these steps:
See Also: Using Intacct Electronic Bank Feeds and Reconciliation
- ACH Bank ID – a unique identifier for your bank
- Immediate Destination Name – the name of your bank, as specified by the bank (23 character limit)
- Immediate Destination ID – typically your banks routing number (9 character limit)
- Immediate Origin Name – your company name, as specified by the bank
- Immediate Origin ID – your 10-digit company number (including hyphens) as specified by the bank
- Reference Code – find out from your bank what to fill in here, or whether to leave it blank
- Include EOF Marker – enable this only if your bank expects a carriage return at the end of the ACH payment file
Setting Up Checking Accounts
Now that ACH payments are configured for your bank, you'll also need to specify ACH information for each checking account that you'll be issuing payments from by following these steps:
- Go to Cash Management from the navigation bar
- Select the Setup tab
- Click Checking Accounts
- Edit the appropriate checking account
- Select the ACH Setup tab
- Select the checkbox to Enable ACH
- Enter the ACH account information in the fields provided under Basic Setup
- Save when complete
See Also: Using Intacct Electronic Bank Feeds and Reconciliation
Configuring Vendors for ACH Payments
With your bank and each checking account setup and ready to process ACH payments in Intacct, you’ll now need to setup vendors for payment as follows:
Alternatively, you can quickly update information for multiple vendors at once by exporting vendor data in "CSV for Import" format, editing the resulting spreadsheet, and then importing your changes. But make sure you’re comfortable with this process because any changes you make in the spreadsheet will overwrite vendor data in Sage Intacct. It’s also a good idea to make a backup of your vendor data before making any changes.
- Go to Accounts Payable from the navigation bar
- Click the All tab
- Select Vendors
- Edit the appropriate vendor(s)
- Select the Payment Information tab on the vendor record
- In the ACH Configuration Details section, Enable ACH for the vendor and specify how you'll be depositing the vendor's payment
- Enter the vendor's routing number, account number, and account type
- For the account classification, select one of the 3 standard industry codes describing the type of transaction you have with this vendor. For business-to-business transactions, CTX or CCD are common codes. For business-to-consumer transactions, such as payments to an individual contractor, use the PPD code. Check with your bank to determine which code is correct
- Save the vendor record when complete
Alternatively, you can quickly update information for multiple vendors at once by exporting vendor data in "CSV for Import" format, editing the resulting spreadsheet, and then importing your changes. But make sure you’re comfortable with this process because any changes you make in the spreadsheet will overwrite vendor data in Sage Intacct. It’s also a good idea to make a backup of your vendor data before making any changes.
NOTE: If you don't see the option to enable ACH and enter bank account information (steps 6 and 7 above), ask your system administrator to edit your permissions to Accounts Payable to give you access to "Bank Details" for vendors.
Processing Sage Intacct ACH Payments
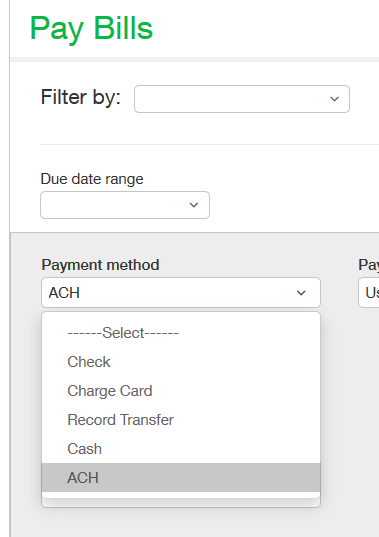
After setup is complete, you'll make ACH payments the same way that you would other types of payments. ACH simply appears as another payment method ("ACH" on the Pay Bills page).
Standard ACH payments are generated in an ACH payment file, which you can then download and send to your bank. When saving an ACH Payment File to submit to the Bank, do not open the file in your browser. The browser may add proprietary encoding that can cause the file to be rejected by the bank. If you want to view the file before sending it to the bank, it’s best to view in Excel, text (notepad), or .ach format.
Note: Payments aren't posted until you confirm the Standard ACH Payment file. If the bank wasn't able to process any of the payments, you can void individual payments and confirm the rest of the file. If there are multiple errors, you may find it easier to delete the payment file and start over.
Note: Payments aren't posted until you confirm the Standard ACH Payment file. If the bank wasn't able to process any of the payments, you can void individual payments and confirm the rest of the file. If there are multiple errors, you may find it easier to delete the payment file and start over.


