Our friends over at Oasis Solutions Group - a Sage 100 Partner in Louisville, KY - recently posted a blog entry that detailed the steps it takes to generate a "On the Fly" check, also known as a "Quick Print," in Sage 100 Accounts Payable. Here's how it works.
1. Accounts Payable --> Main --> Manual Check and Payment Entry
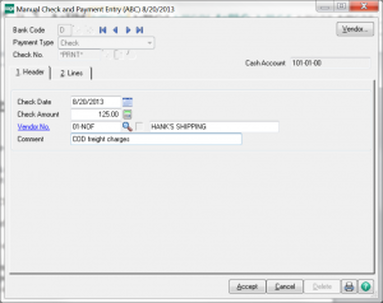
2. Bank Code: Click on the magnifying glass to list the bank codes or enter the one you need if the correct one does not default
3. Check Number: Click the printer icon and the check # will change to “*PRNT*”
4. The check date defaults to the Sage 100 system date (generally today’s date unless changed)
5. Enter the amount of the check
6. Either select a Vendor, or type “NOF” for a not on file vendor; if you enter “NOF” you will be able to type the name of the Payee. (Note: if using AP divisions, you will need to enter the division code before NOF in the vendor number)
7. Enter comment for payment In the example below, an on-the-fly check was needed to pay a third-party freight company for a COD delivery:
8. Click on Tab 2. Lines
9. If the payment will be for invoices already entered in Sage 100 Accounts Payable, you may select the invoices. Alternatively, you may click the “#” button (as shown below) to enter a GL distribution for the payment (may also be prompted to enter the tax schedule).
9. If the payment will be for invoices already entered in Sage 100 Accounts Payable, you may select the invoices. Alternatively, you may click the “#” button (as shown below) to enter a GL distribution for the payment (may also be prompted to enter the tax schedule).
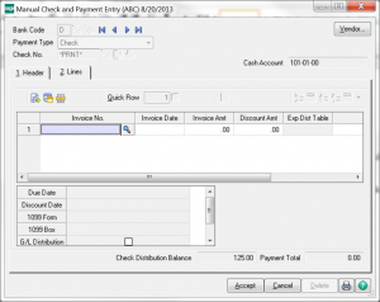
Enter the G/L account(s) and amount(s), then click the Accept button when all accounts/amounts have been entered.

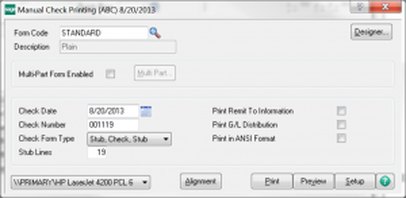
10. Once all payment information has been entered and you are then ready to print the check, click the Accept button at the bottom of the Manual Check and Payment entry window and the manual payment printing screen will appear (as shown below) with the next check #; verify the check # and click the Print button when ready to print the check.
Note: if your check form has been customized, your form code will likely be something other than “STANDARD”
Note: if your check form has been customized, your form code will likely be something other than “STANDARD”
11. You will then be back to the Manual Check and Payment screen. If no other checks will be printed, click the printer icon to print the Manual Check and Payment Register.
12. Review the register. If everything is correct click yes to update
13. Remember: Accounts Payable posting date is the g/l date this transaction will fall into !
14. Print the Daily Transaction Register and update.
12. Review the register. If everything is correct click yes to update
13. Remember: Accounts Payable posting date is the g/l date this transaction will fall into !
14. Print the Daily Transaction Register and update.
Need Sage 100 Support or Training?
Like this Article?
Please feel free to share it with your friends and colleagues!
Please feel free to share it with your friends and colleagues!