Whether a check was sent in the wrong amount, to the wrong vendor, or a variety of other reasons, sometimes you’ll need to reverse a check in Sage 100. And other times, you’ll want to void a check instead. Here’s how to do both.
Void a Check in Sage 100
The option to void a check in Sage 100 is straight-forward so we’ll start there. You can only void a check if it has not yet been issued or recorded (in other words, has not already been used to pay an invoice).
The situation often results from a printer malfunction that renders the check unusable. In order to maintain a proper audit trail, you’ll still want to record the check number in the system as a voided check.
To void an un-issued check:
1. Select Accounts Payable Main menu > Manual Check and Payment Entry.
2. Enter the bank code, check number, and check date.
3. In the Check Amount field, type .00 as the check amount.
4. When a message asks if this is a voided check, click Yes to record the check number as a voided check. The words ***VOID CHECK*** will print for the check number on the Check and Electronic Payment Register.
5. Click Accept.
And that’s it! The voided check number is recorded.
If a check has already been issued or recorded in Sage 100, then read on to learn how to reverse a check instead.
Reverse a Check in Sage 100
IMPORTANT UPDATE IN SAGE 100 2020
The release of Sage 100 2020.1 introduced a new Reverse Check Run utility that has been added to the Accounts Payable Utilities menu. You can use this utility to reverse an entire check run. Check runs are selected by entering either a register number or a bank code and check number. Checks with a type of Auto (a standard check) and Electronic that are posted to the cash disbursements journal can be reversed.
But it's important to note that the new Reverse Check Run Utility feature is only available to customers on a Sage 100 Subscription (refer to: Sage 100 subscription vs perpetual).
If you're still running Sage 100 on a perpetual license, read below for check reversal instructions in Sage 100 "Classic" ...
If you stopped payment on a check, wrote and recorded a check for the wrong amount, or wrote and recorded a check to the wrong vendor, you'll have to reverse a check in Sage 100. This process reverses the check/payment transaction and reopens invoices for payment (or adjustment) for the bank and Accounts Payable accounts.
To reverse a check:
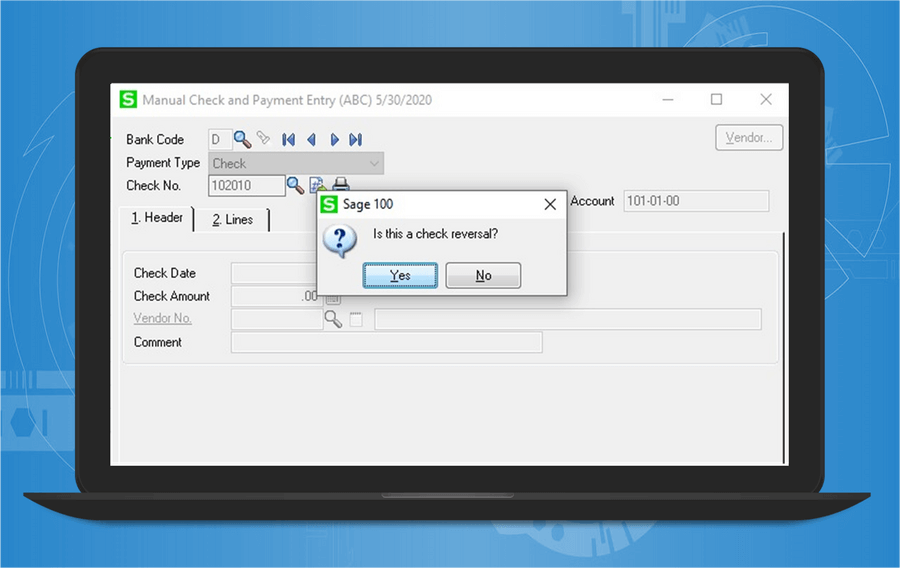
1. Select Account Payable Main menu > Manual Check and Payment Entry.
2. In the Bank Code field, enter the bank code for the check entry to reverse.
3. In the Check Number field, enter the number of the check to reverse.
4. A message appears asking if this is a check reversal. Click Yes.
Note: If there are multiple checks with the same check number, the Check Reversal List window appears. Select the check to reverse and click Select.
5. A message appears asking if you want to recall invoices paid by this check. Perform one of the following:
6. If the Accounts Payable module is integrated with Job Cost, a message indicates that the Job Cost invoices have been recalled and that manual distribution of those invoices is required. Click OK.
7. Click the Lines tab. A negative invoice amount appears in the Invoice Amt field.
8. If you clicked No in step 5, click the Create G/L Distribution button.
9. In the General Ledger Distribution window, distribute the negative check amount to the appropriate accounts, and click Accept.
10. In Manual Check and Payment Entry, click Accept.
Congratulations! You Sage 100 check has been reversed.
To reverse a check:
1. Select Account Payable Main menu > Manual Check and Payment Entry.
2. In the Bank Code field, enter the bank code for the check entry to reverse.
3. In the Check Number field, enter the number of the check to reverse.
4. A message appears asking if this is a check reversal. Click Yes.
Note: If there are multiple checks with the same check number, the Check Reversal List window appears. Select the check to reverse and click Select.
5. A message appears asking if you want to recall invoices paid by this check. Perform one of the following:
- Click No to avoid posting an open invoice to the vendor’s Open Invoice file (proceed to Step 8 if you choose No to recall invoices)
- Click Yes to open the original invoice.
6. If the Accounts Payable module is integrated with Job Cost, a message indicates that the Job Cost invoices have been recalled and that manual distribution of those invoices is required. Click OK.
7. Click the Lines tab. A negative invoice amount appears in the Invoice Amt field.
8. If you clicked No in step 5, click the Create G/L Distribution button.
9. In the General Ledger Distribution window, distribute the negative check amount to the appropriate accounts, and click Accept.
10. In Manual Check and Payment Entry, click Accept.
Congratulations! You Sage 100 check has been reversed.
|
THINGS TO NOTE:
On the Check History Report, reversed check entries appear with a negative check amount and Reversal as the check type. Only the checks in check history can be reversed. If the check was purged or was never entered, you must manually enter the check’s header information and re-enter the original posting amounts using negative numbers. If you are reversing a check without recalling the original invoice, you can select an expense distribution table to distribute the amounts using general ledger accounts and distribution percentages defined in Expense Distribution Table Maintenance. Refer to How to Reverse a Check Using an Expense Distribution Table for more detail guidance. |

|