Create Visual Process Flows on your Sage X3 desktop allow for the graphical representation of a typical transaction cycle and easier navigation to the relevant functions and tasks in that cycle. It offers an easy and alternative way for you to navigate through the application (instead of relying on the extensive menus and lists of tasks). The steps for defining which Process Flows you want to add to the desktop portal are found mainly in the Interactive Dashboard menu under Parameters. Here's how it's done.
Overview: How to Create a Process Flow
The first step in the entire process is to Create the Process Flow using the Process Flow Editor, which can be found under the processes function. This is where you assign a code and name to your process flow.
Next, you'll Define a Desktop Gadget and link it to the Process Code that you defined under the Processes function.
Finally once your gadget is defined, you’ll use the Add Content menu to add the Process Flow to your Desktop.
Next, you'll Define a Desktop Gadget and link it to the Process Code that you defined under the Processes function.
Finally once your gadget is defined, you’ll use the Add Content menu to add the Process Flow to your Desktop.
Step One: Define the Process Flow
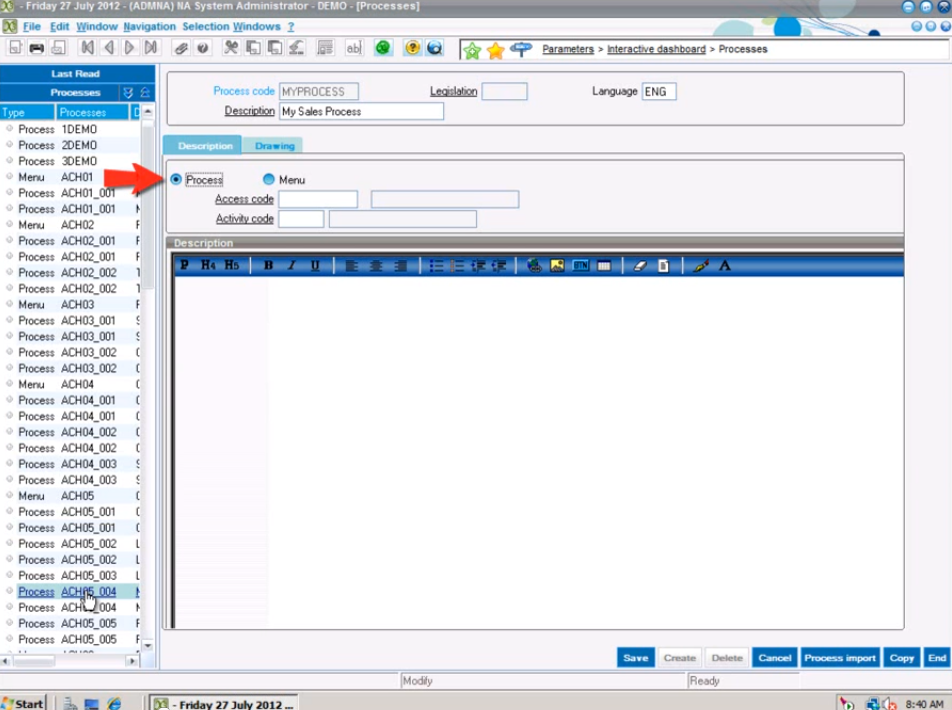
To define a Process Flow in Sage X3, go to:
Parameters > Interactive Dashboard > Processes function
Once your process is loaded, identify the Process Code. This is an important field to remember because you'll be using that process code throughout these steps.
Now you can assign a legislation and a language to your process code. Enter a description and check the box next to Process on the Description Tab. To assign security settings, enter the appropriate Access Code and Activity Code.
Note: if you wish to assign a more detailed description, you can do so under the Description section.
Now, the Process Flow is designed in the drawing section. Using the Process Flow Editor, finish designing the process flow and fine tune its settings. After you've finished adding your description, make note of the Process Code that you’re using and save your changes.
Step One Complete! This completes the first step; you've now successfully defined your process code and designed your Process Flow using the Process Flow Editor.
Step One Complete! This completes the first step; you've now successfully defined your process code and designed your Process Flow using the Process Flow Editor.
Step Two: Create the Desktop Gadget
The next step is creating the gadget that will go onto your desktop portal. Every item that you add to the Sage X3 desktop portal is a gadget, so go into the "Gadgets" function to create a new gadget.
Gadgets > New
Click "New" and give it the code. It's important to use the same code for your gadget that you've used for your Process Code, as well as the same descriptions. This makes it easier to reconcile the two; you'll know exactly what gadget relates to what Process Code. Because you are working with a Process Code, the new gadget will go into the Processes group.
The Connection section lets you define determine where the gadget is going to be located in the next menu, the "Add Content" menu. To add the Gadget to a sub-menu, simply specify a sub-menu. If you want the Gadget to appear at the highest level (right at the top), leave the Connection Menu blank or leave the sequence at zero.
The Parameter section is where you define default values and the process code for your new gadget. The first thing that you should define is the default height. You'll notice that the flag is changeable, which means that you'll have the option of changing that setting after you've added it to your desktop. Next, edit the Process Code (be sure to verify that you have the correct one) and- then finally on to the Icon section.
The Icon section is where you edit the icon that would appear in the next menu, the "Add Content" menu, which is also where you can also add a more detailed description. Once you've filled out the Parameters, go ahead and Create.
Quick Review: So let's review the steps you've taken thus far. You've defined your Visual Process Flow by Process Code, created the gadget, and then added the Process Code to that gadget. Now onto the last step. Go to the "Add Content" menu (located top-left) to finish adding the Visual Process Flow to your Sage X3 desktop.
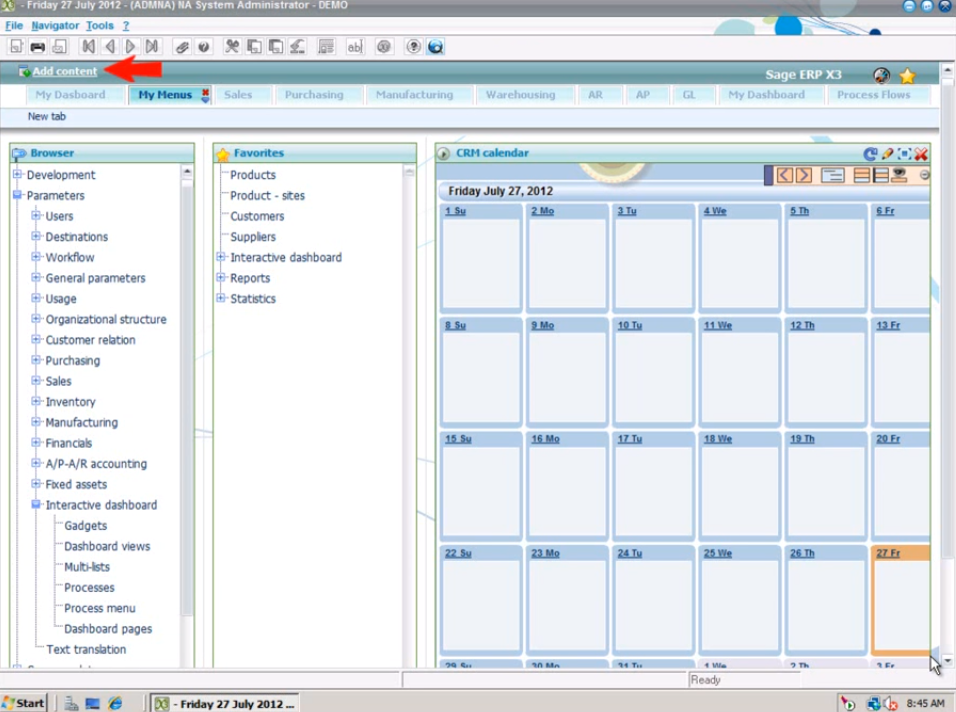
Step Three: Add the Process Flow to the Sage X3 Desktop
In order to update the "Add Content" menu with the new gadget, you have to refresh your desktop. To do that you can either use the shortcut key F5, or go to the Navigator menu and select "refresh."
F5 (Refresh) > Add Content > Drag-Drop New Process Onto Desktop
After you have refreshed your menu, go to the "Add Content" menu where you should see your process. Take that process, drag it, and drop it onto the desktop. When you're done, close the "Add Content" menu and you should see that your process workflow has been added to your desktop.
And that's how you go about defining Visual Process Flows and add them to your Sage X3 desktop.
For step-by-step instruction, check out this video demonstration: