 Image Courtesy of ddpavumba / FreeDigitalPhotos.net
Technology sure has come a long. But as businesses become more reliant on technology, it's also important to remember that technology isn't always foolproof. Computer viruses, hardware failure, theft, and even natural disasters have the potential to cripple your business if you don't have a recent backup of your Sage 300 (formerly "Accpac") database.
Making backups (and testing those backups) is vital to every company and should be a part of your regular business practices. At a minimum, you should create a backup before an upgrade, before and after processing year end, and before any major system changes - like system integration, or module installation.
Here's how to create - and restore - database backups in your Sage 300 system.
How to CREATE a Database Backup
Follow the steps below to create a database backup in Sage 300 ERP.
Note: You will need the Admin Password to create a backup. No other users can log into Sage 300 ERP while these utilities are in use.
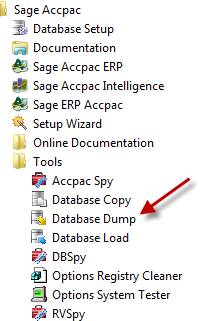
1. Click the Start button, highlight Programs, then Sage 300 ERP, Tools, and click Database Dump.
2. Type the password for the Admin user in Sage 300 ERP, then click the OK button.
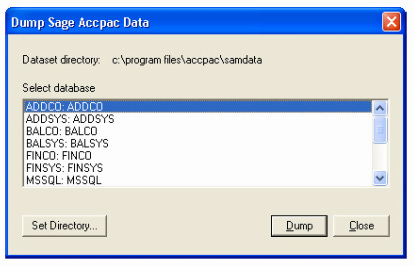
3. Click to highlight the database that you want to Dump. Click the Set Directory button to enter the location where you want to save the files.
Database Dump creates a control file with filename extension .DCT in the folder you specify, and puts the actual extracted data in a subfolder of the same name as the DCT. The default location of the folder is . . .\Sage Accpac\Runtime. The name of the control file is the database ID with the .DCT extension.
4. Click OK. You'll return to the Dump Sage 300 ERP Data screen.
5. Click the Dump button to proceed. A confirmation message will appear
6. Click OK to continue.
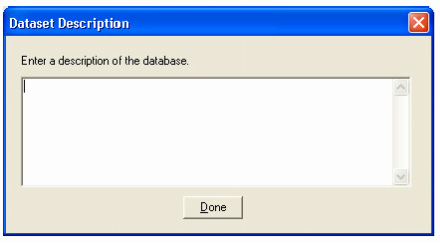
7. A Dataset Description screen will display in which an optional description of the database may be entered.. Enter a description, then click Done.
5. Click the Dump button to proceed. A confirmation message will appear
6. Click OK to continue.
7. A Dataset Description screen will display in which an optional description of the database may be entered.. Enter a description, then click Done.
How to RESTORE a Database Backup
9. Click Close to end the session.
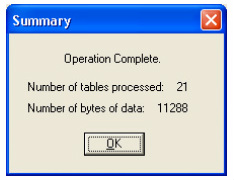
8. A summary message will then display. Click OK. This will return to the Dump Sage 300 Data screen.
Note: When storing extracted data you must retain both the control file and its associated folder.
Take the following steps to restore a database backup.
Note: Database Load takes a dataset (extracted data) and loads it into your Sage 300 ERP database. Any data already in the database will be deleted.
1. Click the Start button, highlight Programs, then Sage 300 ERP, Tools, and click Database Load.
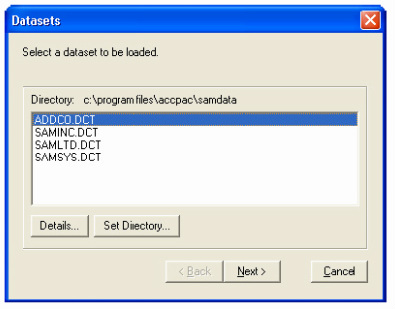
2. Enter the password for the Admin user, then click OK. The Datasets window lists the Sage 300 ERP datasets available for loading.
2. Enter the password for the Admin user, then click OK. The Datasets window lists the Sage 300 ERP datasets available for loading.
3. Click the Set Directory button to select the directory for the datasets that you want to restore if they don't appear in this window.
4. Click the Details button if you want further information about a highlighted dataset. The load utility will allow you to select, in turn, each of the databases you want to load.
5. Click Next. The next window lists the databases existing on your system.
Highlight the target database that you want to load into, then click Next.
6. Highlight the target database that you want to load into, then click Next.
7. Make sure you select the correct database. The Load will delete all existing tables in the database you select and replace all existing data.
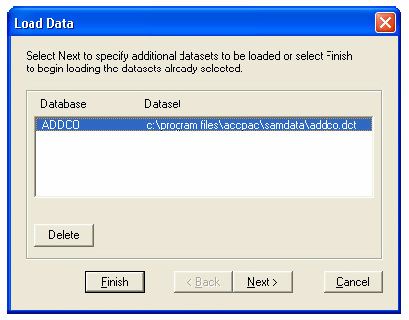
8. Click Next to load another dataset. After you have selected as many datasets as you wish for this load, the Load Data window reappears, displaying the databases ready to be loaded.
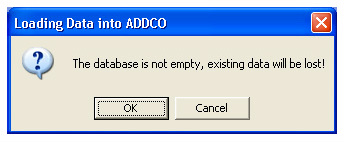
9. Click Finish to load the data. If the target database already contains data, a warning message will appear. If you are loading more than one dataset, this message appears for each set that already contains data.
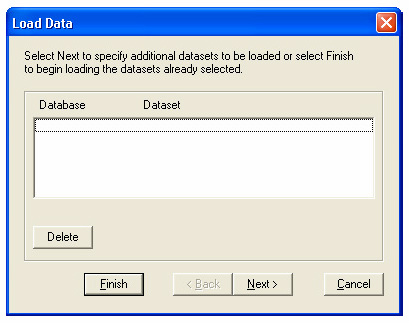
10. Click OK when you have checked that you are loading the data into the correct location. You will see messages that the data is being loaded, then the Load Data screen reappears.
Note: that the dataset we used in our example has now been loaded, and the list is empty.
11. Click Next to load more datasets into other databases, or click Cancel to end the session.
Need Sage 300 Support?
Contact a Sage Partner if you have questions regarding database backups, data decovery, or anything in between. Click below to find a Sage Authorized partner in your area.
Related Articles:
Complete Guide to Sage 300 Keyboard Shortcuts and Hotkeys
How to Download and Install a Sage 300 Hotfix
Sage 300 Installation Guides
How to Backup Your Sage 100 Company Database
Sage 300 Product Info and Features
Complete Guide to Sage 300 Keyboard Shortcuts and Hotkeys
How to Download and Install a Sage 300 Hotfix
Sage 300 Installation Guides
How to Backup Your Sage 100 Company Database
Sage 300 Product Info and Features
Was This Article Helpful?
Please share with your friends and co-workers:
Please share with your friends and co-workers:
