In this blog post, we will show you HOW to color code companies in Sage 300 step-by-step.
Let’s take a closer look …
One of the new features introduced in the Sage 300 2020.2 release was the ability to assign a unique color to your Web Screens for each company in your Sage 300 database. Previously, assigning multiple company colors was available only in the Sage 300 classic screens as discussed in this article originally posted in 2014. Now, customers working with the newer Sage 300 web screens can also benefit from this popular feature. The process for setting up color coding is the same in both Classic and Web Screens.
How it Works
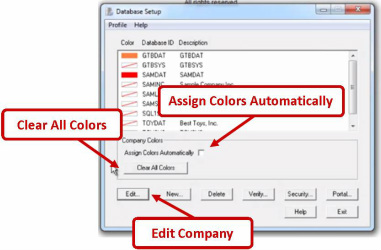
Database Setup - assign or clear colors for all companies.
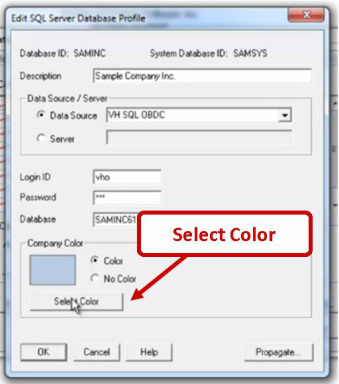
Edit Database Profile screen - Change the color assigned to a specific company, or turn off the company color option for that company.
1. Access Sage 300 Database Setup
Next, select Sage 300 and click on Database Setup.
On the Database Setup screen, select the Assign Colors Automatically option.
Sage 300 then assigns colors to all companies for which a database has been set up.
2. To Edit Company Colors or Select a Different Color
Click on the company that you wish to color-code and select Edit.
On the Edit Database Profile screen, click the Select Color button.
Choose a desired color, and then click OK.
Click OK to close the Edit Database Profile screen
In the Color column, a color swatch indicates the new color assigned to the company.
3. View Company Database
You will notice right away that the Windows title bar and border have been changed to your choice of color. Even the preview windows that appear when you hover over the task bar icons have been color-coded.
4. To Turn Off a Company Color
- On the Database Setup screen, select a company, and then click Edit.
- On the Edit Database Profile screen, select the No Color option.
- Click OK to close the Edit Database Profile screen.
See It In Action!
Now you know how to change a company’s color in Sage 300.


